Wednesday, April 27, 2011

Provencal Tian

Jump to Recipe >>>

How many of you have had enough of the Royal Wedding? I certainly have. Starting from the cake and cookies that were going to be made for the occasion, dresses that the bride was going to wear, and dissecting the guest lists, most TV stations had started a month ago. I was not terribly fond of Princess Diana and the incessant coverage of everything she did was more than enough and now this is totally out of control.


Arranged vegetables with cheese sprinkled on top

Why is a wedding of a tax payer funded royal so popular here in the US? Aren't the American people against everything smacking of elitism and classicism? What can smack more of classics than a royal's wedding? Is it the case of coverage that far exceeds interest or just enough coverage to match the interest?


Here is my problem, most of these royals don't lift a finger and do anything and that is all I can think of whenever I see and hear of this lavish pageantry.

If only they'd do it quietly and leave the rest of us to go about our uninteresting commoner lives. If you are one of them who is going to have a party to celebrate the occasion, Have Fun!. You are not fuming and complaining like I am and that is certainly a good thing and the only way to deal with it.

So lets leave the noisy royal party behind and cross the English Channel and go over to France and try one of their sensible dishes which uses fresh vegetables. This recipe is from a French mother-daughter pair who live in our neck of the woods and they cook to relax. With tasty and minimum effort dishes like these why is there a need to eat out. They had mentioned that they much prefer cooking at home. Apparently "French women think dining in is as sexy as dining out." The article in my hometown newspaper here which is were the recipe is from as well.

Besides being an easy recipe with minimal ingredients and cheese meant it is going to please the kids. Stir fries the most common way to cook vegetables does not always excite them that much. With this recipe I guarantee they will be asking for seconds.

You could use the big oven but to cut down on time and energy usage, I used the toaster oven.


Recipe Source: Provencal Tian
Provencal Tian
Ingredients
1. 2 Medium sized Zucchinis cut into thin rounds
2. 1 Medium Red onion (smaller the better) cut into thin rounds
3. 1 firm but ripe Roma tomato cut into thin round
4. 2 tsp (or more) of pepper powder
4a. Eggplants cut into rounds very thin (I did not use it)
5. salt as required
6. 1/4 - 1/2 cup cheese (I used a combination of Parmesan cheese and 3 cheese blend (fontina, asiago, parmesan)
7. Oil spray

Method
1. Preheat the oven to 400 degrees
2. Use a oven proof plate (pie plate would work perfectly). I used the toaster bake tray and arrange d the cut vegetables if circular concentrically with one of zucchini followed by a combination of onions and tomatoes and so forth into 3 layers. We interspersed the onions and tomatoes in between the zucchini.
3. After one layer of vegetables spray oil, sprinkle pepper and salt. Repeat for all layers
3. Layer the cheese on top (as thick or thin as you want)
4. Bake for 20 minutes or till the zucchini is cooked and then broil for 5 minutes till the cheese is nice and brown on top. Don't over broil.

Sunday, April 24, 2011

Cauliflower manchurian or Gobi Manchurian

My first taste of Chinese food back home was while in college. Chinese food was the only exotic foreign food available those days. Listed on the menu card would be items that Chinese restaurants goers in this country would not recognize.


Starting with sweet corn soup, noodles, manchurian (gobi, chicken, baby corn) and the star the American chopsuey a meal at a Chinese restaurant was always fun. Fast forward a few years and a visit to a Chinese restaurant in the States was more like groping in the dark. There were none of the familiar sounding Chinese food items that we were used to seeing back home listed on the menu card. Too much of soy sauce, oily, with crushed chilies and weird sounding names like Kang Pao chicken, schezwan chicken, lo mein, and an assortment of other names that did not evoke the joy of the Chinese food I was used to.


After living here for a while now I have slowly gotten used to the taste of Chinese(American Chinese?) food available here and even venture to cook some of those dishes at home.

I also learned that Chinese back home has a name - Indo Chinese and what was offered were Indianized versions of food that bears little resemblance to mainland Chinese food.


Cauliflower manchurian or any manchurian an Indo Chinese dish that is a very popular both as a restaurant and street fare. Served as an appetizer or a main course the blending flavors make it irresistible. Manchurian is made with cauliflower, chicken, baby corn or mushrooms. Besides tasting them on trips back home cauliflower manchurian has been elusive item in my kitchen. Last weekend a rainy Saturday and ample cauliflower provided just the impetus to try out this recipe.

Other than the deep frying part this is pretty easy and simple recipe. There are a lot of recipes online. I particularly liked this one from Soma's ecurry.com and this one from Edible Garden.

I made the sauce first and then proceeded to deep fry the cauliflower and add to the sauce.


Cauliflower Manchurian
Ingredients
1. 1 Cauliflower cut into florets, wash and set aside
2. 1 White onion cut into chunks
3. 1 Green bell pepper cut into chunks
4. 1 bunch scallions or green onions cut the green portion into inch sized pieces and the white portion into smaller size for garnish
5. 10 garlic cloves chopped fine + 2 tbsp grated ginger
6 1/2 tbsp of red chili powder
7. 1/4 cup of ketchup ( I used the unsweetened variety)
8. 1/4 cup of chili garlic sauce
9. 2 tbsp of soy sauce
10. 2-3 tsp of oil


Batter for deep frying
10. 1 cup of all purpose flour
11. 1/4 cup of corn starch
12. 5 garlic cloves + 2 inch piece of ginger
13. 2 tsp of pepper powder
14. 4-5 green chilies
15. salt to taste
16. 1/2 cup of water

17. Oil for deep frying


Method
1. In a wide mouthed pan heat the oil and add in the onions and saute till they are soft
2. Add in the garlic and ginger and saute for a couple of minutes
3. Add in the scallions and bell peppers and saute till they are cooked well
4. Now add the sauces, chili powder and let it cook, check for salt and spice and add more if required and turn off the heat. The sauce should be thick and coat a spoon
5. Set a pot of water to boil, salt it and when it comes to a boil turn off the heat, add the cauliflower and let it sit for 10-15 minutes. Drain and pat dry with a towel.

For the batter,
6. Blend the green chilies, ginger and garlic
7. Whisk the green chilies mixture along with the other ingredients listed in the batter section along with quarter cup of water to form a thick batter
8. Heat a frying pan with oil and when hot
9. Dip each floret in the batter deep fry till they are golden brown on both sides
10. Drain on paper towels
11. Once all of the cauliflower has been coated and deep fried add them to the prepared sauce
12. Let it heat through and make sure all the cauliflower are evenly coated

Serve as appetizers with tooth picks or as a side with rice

Wednesday, April 20, 2011

Gardening 101

I occasionally get questions from friends and blog readers about preparing their garden plot for planting, pest control and seed starting.

Disclaimer: I am by no means an expert on gardening. What I am is an enthusiastic amateur, doggedly stubborn and that is pretty much the qualification I have. Deer, rabbits, ground hogs, caterpillars and stink bugs have only made me more stubborn.

Here are a couple of questions that I got:

1. Can you share in a post - what kind of soil / how you prepped the area before you sowed the seeds in? And how you got the seeds started?

If you have a 5 x 5 square feet of land, it is more than sufficient to grow vegetables for the season. Start with a small area and as you get the feel, experience and what works for your area you can expand to a bigger area. First thing in starting a garden is to choose the right spot.

Choosing the plot:
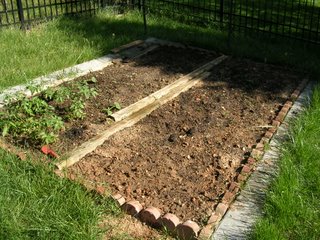
This patch of land gets shade from the neighbor's huge pine trees which were not so huge when the plot was first prepared

The first and foremost is choosing the location to start the plot. Choose a sunny location which gets 6-8 hours of direct sunlight during the day. Most vegetables require at least 6 hours of sunlight. A fairly flat land area would be most suitable to avoid runoffs. (Not to worry if you do not have a perfect spot there are always ways to work around it. Starting a garden is more important.)

Garden bed:
Once the location is finalized, next is to decide what kind of bed you want - an in ground bed or a raised bed. A raised bed requires building and an in ground bed requires lot of digging. So depending on your skills and ability choose appropriately. A raised bed is easier to start if you have hard or clayey soil.

Before you start working on your garden bed locate a source of manure. Horse or dairy farms give away manure for free. Your local hardware store will have packaged manure, peat moss and top soil which are all required for preparing the garden bed.

In ground bed
1. Dig 12 - 16 of your marked garden plot and loosen the soil and get half of them out. Tools like roto tiller, shovel, rakes can all be rented. An electric tiller like this would be very handy. We did it the old fashioned way with shovels.
2. Mix in top soil, potting soil, peat moss, the dug up soil, manure/compost and spread it evenly on the plot. (did not follow any required proportion)
3. Edge the plot with wood or stone to prevent water from flowing out.
4. You can approach your local agriculture extension and ask them to do a soil test to find out what to add to the soil. for e.g. if the soil is too acidic adding lime would help improve the pH.


Raised bed
Look at these two tutorials for creating a raised bed
  1. How to build a raised bed from Backyard Boss
  2. How to build the perfect raised bed from Sunset.com
  3. Tutorial on building a raised bed from Pioneer Woman
  4. Growboxes from Kalyn's Kitchen

Once the raised bed is built mix in the required dirt, potting soil, compost/manure and you are all set for a season of growing. I have no experience with this kind of bed but there are a lot of resources online.

Container Gardens
If preparing a patch is too much work, container gardening is an easy way to start a vegetable garden. I use containers because of the lack of sunlight in my garden patch. 10 0r 20 gallon flower pots (I use smaller ones too). Fill them with the same combination of dirt and organic material and you are good to go.


Containers are easy in a way because they can be moved around (not during the day but for the season) and the controlled soil helps their growth. I have grown tomatoes, peas, beans, greens, egg plants, ridge gourd, snake gourd and chilies in these pots.


Starting seeds indoors or sowing seeds directly
Though most seeds can be sowed directly on to the ground, it is good to start them indoors during spring to get a head start on the growing season. I have a very simple setup to sprout seedlings. A sunny window sill or a table next to the window works great. If you do not have a sunny window, place the seed starting setup under fluorescent lamps.


1.Small peat moss seed starting pots are good for a seedling or two in each ( I like these because they can are degradable and the seedlings can be planted directly in them into the ground theoretically, I tear them apart and plant them). If you have small plastic pots they are also come in handy for seed starting.
2. Seed Starting mix (these work better than using regular soil)
3. Seeds


Give 4-6 weeks for the seedlings to sprout. Starting them towards end of March or early April would give enough time for them to be transplanted in May. (In my zone they can transplanted after Mother's Day, check what works for your area.)


Some seeds with hard outer covering(bitter gourd, snake gourd, ridge gourd) requires that the seeds be soaked overnight and the outer shell slightly bruised to enable them to sprout. Most smaller seeds like those of tomatoes, eggplants, chilies sprout without any special treatment.

I transplant the seedlings more or less following the calendar rather than the size of the plants.

Transplanting the seedlings
Prepare the raised rows horizontally or vertically depending upon the orientation of the garden bed. Alternate between raised and flat rows (the flat rows next to raised rows are for watering so the soil does not get washed away). Plant the seedlings spaced as per instructions on the seed packets, a good 10-12 inches between plants will provide enough space for most plants to grow. Dig to a depth of 6-8 inches, place the seedling and cover with the dirt. Make an elevated mound close to the plant and pack the dirt around the plant. Water the plants regularly and enjoy their bounty.

Fertilizers and Pesticides
I avoid using synthetic fertilizers and pesticides in the vegetable garden. Using blood meal, water from kitchen washings (it is pain to collect the water and transfer it to the garden but hey) and the compost serve as the nutrients for the plants.
Note: I would not use the kitchen water for indoor plants. They attract fruit flies and other creatures you do not want inside the house.

As for controlling pests I use crushed mint with dish washing soap liquid. I have loads and loads of mint growing so this works for me. Take a good quantity of mint blend it to a fairly smooth paste. For a cup of mint leaves mix with 2 tbsp of dish washing liquid with 2 cups of water and spray on the plants. This takes care of most of the pests especially on the eggplants. Mixing in cayenne pepper also works but this turns out be an expensive form of pest control.

Tomatoes and chili plants seem to do alright. The most common pests on these plants are Polyphemus moth caterpillars , the huge green ones which can fell a plant in a day. I usually walk around and take them out of the plants and do the needful.

Pest control for Indoor plants
2. Do you have any suggestions? Diluted neem oil spray? There is something called insecticidal soap? Do you use anything?

Yes, I have heard neem oil is very effective but I do not have them handy always. I have not used insecticidal soap either.

What works for me is diluted dish washing liquid sprayed on the plants directly.

Spraying diluted boric acid also seems to work.

Most times it works better for me to remove the plant with the pests and destroy it than try to eradicate the pests. With the controlled temperature inside the house most pests tend to thrive and it spreads to all the plants leaving bigger problem in your hands.

Sorry I am not much help on this issue.

I do not grow curry leaves plants for this very reason. They always seem to be infected with scale. They spread quickly too. Well meaning friends have given me curry leave plants but they always come infected with scale and I am not comfortable having them indoors where they are more than likely to spread. So I leave the plant out to dry in the winter :( I have found no easy solution to deal with particular pest.


I hope this gives some very basic information to start and grow a garden. Please feel to leave specific questions you may have. All I can promise is to tell you what I do when faced with a similar situation. Moreover readers are welcome to give any tips and suggestions they may have.


Where to purchase seeds
Resources listed here.


Good Luck and may our gardens grow beautifully!!

Sunday, April 17, 2011

Taro root and raw peanuts in tamarind sauce (Sepang kizhangu kadalai puzhi kuzhambu)

Here is a question? What scares you more fat or sugar/highly processed carbohydrates?
Clue: Free time reading about Sugar.


Puzhi Kuzhambu(tangy curry usually made with tamarind pulp) has always been a favorite from when I can remember. If there was puzhi kuzhambu on the menu it was a good meal as far as I was considered. Any vegetable, the first thought that goes through my head is if it is suitable for a tamarind based curry.


Taro root (Arvi in Hindi) is much tastier than potatoes in my opinion. It makes for some very tasty stir fries, baked fries and spicy curries. When making curries it is better (perhaps required) to roast the taro before using them in gravies. This seals off the outside and prevents the natural sliminess of the taro oozing into the gravy. The addition of the peanuts besides adding some protein also gives some tasty crunch.


Taro root and raw peanuts in tamarind sauce (Sepan kizhangu kadalai puzhi kuzhambu)
Ingredients
1. 6-8 medium sized taro roots
2. 1 cup of raw peanuts (or even 2 cups)
3. 1/2 cup of onions chopped
4. 5-6 garlic cloves
5. 1 tbsp puzhi kuzhambu powder or sambhar powder
6. tamarind pulp from a small lime sized ball of tamarind (about 1 1/2 cups)
7. 2 ripe tomatoes (3/4 - 1 cup)
8. seasonings: cumin, mustard seeds, methi seeds, curry leaves
9. salt to taste
10. 2 tsp of jaggery

Method
1. Boil the taro root till it is half cooked, peel and cut into slices and set aside.
2. In a wide mouthed saute pan heat a tsp of oil and roast the taro root slices till they turn slightly brown on the outside.
3. Soak the tamarind in about 1 1/2 cups of water
4. Pressure cook the raw peanuts and drain
5. In a pan heat oil and add the seasonings when the mustard starts to pop add the onions and let it brown. Add the garlic cloves and saute for a minute.
6. Add in the roasted taro root, salt and stir fry for a minute.
7. Add in the puzhi kuzhambu powder (add chili powder if required). Stir fry for 2-3 minutes.
8. Add in the chopped tomatoes and stir fry for a couple of minutes.
9. Add the tamarind pulp and 2 cups more of water and let it come to a boil.
10. Add the cooked peanuts, jaggery and cook for 5 more minutes and turn off heat if required consistency is reached.

Serve with rice.

Wednesday, April 13, 2011

Vermicelli Dates Pudding

It is amazing atrocious what public schools in the US feed kids these days. I still remember the day DD started public school. She was excited to hold the menu and could not wait to try lunch the first day of school. Want to know what got her so excited? It was shrimp poppers. Until then she was eating lunch packed by yours truly as the school she was attending before did not have a cafeteria.

The first thing after she got off the bus that day was beg me to pack lunch and not make her eat cafeteria food. To this day she'd rather eat anything even stuff she hates packed from home rather than eat at school.


I was reminded of this when we were watching the first episode of Jamie Oliver's Food Revolution's new season. He struggles unsuccessfully to get the LASD to open up their kitchen and show him how food is prepared. For someone not familiar with the school food here it might have looked like he was grossly exaggerating. If only he was and some school districts I bet are even worse. Why the reluctance and secrecy otherwise? It is really sad what is fed to kids as food at schools and there is of course a powerful lobby here that prompts and supports junk all in the name of nutrition. Even if chocolate milk is 80% sugar it is supposed to be good for the kids! Why does food always have to taste good (read as sweet)?

As parents we have to step up and take responsibility for the kinds of foods our kids are eating and demand school systems to not feed junk. Sadly eating is a habit when not well formed in the early years is going to stick around for a long long time causing more trouble than it is worth.

Most everybody agrees that there is far too much sugar in foods that are served to kids and they are sure not healthy. Tasty sweet foods does not have to be unhealthy if cooked the right way.

Take this pudding for example a typical traditional Indian desert. It is healthy enough to be eaten for breakfast. Addition of dates make it is naturally sweet. Add fresh cut fruits and it has every food group covered.

It is also New year in my parts, to those celebrating தமிà®´் புத்தாண்டு வாà®´்த்துக்கள். We celebrated the new year with this delicious sweet and it is also happened to be the birthday of someone in the household .


Vermicelli Date Pudding
1. 3 Cups of 2% milk (fat free would work)
2. 1/4 cup roasted vermicelli
3. 2 tbsp of tapioca pearls (optional)
4. 2 tbsp of broken cashews
5. 1 tbsp of golden raisins
6. Fresh fruits (mango, pineapple)
7. 8 medjool dates or about 1/2 cup of dates seeds removed
8. 2 tbsp of sugar (if required)
10. 1/2 tsp cardamom powder
11. 2 tsp of ghee

Method
1. In a saucepan take about 2 tbsp of water and dates and let them cook for 10
minutes. Cool
2. Soak the tapioca pearls in water (just enough to cover it) and let sit for 1/2-1 hour
3. Puree the dates, add 1/4 cup of milk if required to blend
4.In a heavy bottomed pan heat the milk and when it comes to a boil add the vermicelli and let it cook for 8-10 minutes
5. Rinse out the vermicelli and add to the milk (this is to avoid getting the starch into the milk)
6. Add the pureed dates, cardamom powder and mix, taste and add sugar if required, boil for another 5 minutes and turn off the heat
7. Heat the ghee in a pan and roast the cashews and raisins
8. Add the nuts and fresh mangoes on top and serve

Saturday, April 9, 2011

Mango Moong Dal

With the Federal shutdown out of the way we can move on to other important things. Living in the shadow of the Nation's capital like we do a shutdown would paralyze a large portion of life around here. Memory of the last one not a distant memory and what it could do the personal life of a president still lingering another one was not very welcome.

If you live in the NE US and are starting a backyard garden, now is the time to start the seeds indoors. They will be ready to be transplanted outside end of May. If you are lucking to be living in the South (US) you are probably already well into your growing season.

Now to the recipe,
I had bought a raw mango hoping to make some mango pickle but it was not meant to be. So the next best thing was making dal out of it before it became completely unusable. I usually make sambhar with mango and drumstick but with the Andhra influence big I decided to make mango pappu (or mango dal). Toor dal can be used but I like the taste of moong dal and I was making a side dish for idli. Combined the method my mom uses to make breakfast sambhar for idli.


Mango Moong Dal Recipe
Ingredients
1. 1 cup of split moong dal (preferably without skin)
2. 1 cup of raw mangoes cut into small cubes (peel the skin if it is tough)
3 1 medium sized ripe tomato
4. 1/4 cup chopped onions
5. 4 slit green chilies or 1/2 tbsp sambhar powder
6. 1 tsp turmeric powder
7. seasonings: mustards seeds, cumin seeds and curry leaves
8. 1 tsp of oil and salt to taste
9. handful of chopped coriander leaves

Method
1. Pressure cook the moong, onion, tomato and mango with 2 cups of water, turmeric powder, sambhar powder(or green chilies) and few drops of sesame oil for 2 whistles, cool and mash it with a back of a spoon.
2. If the cooked dal is too thick add a cup more of water if required (or as much water as you'd like) and let it come to a boil (3-5 minutes)
3. Add salt and coriander leaves
4. In a small pan heat the oil add the cumin and mustard seeds followed by the curry leaves. Pour over the dal

Tastes good idlis or dosais but I bet it tastes good with rice as well.

Tuesday, April 5, 2011

Swiss Chard Stir Fry

The Sunday edition of 'The Washington Post' - my hometown newspaper had two articles about India in two different sections of the paper, one in the business section and another in the sports section. News about India in the business section of the paper is not new but news in the sports section is definitely new. Americans don't much care for cricket other than to ask if it is like baseball.

Euphoria in the sports pages after India's spectacular win in the World Cup and frustration in the business section with the seemingly unending and far reaching corruption and voices of who's who in business caught on tape making shady deals. This is what India is all about isn't?

Gujarat and TamilNadu two states are supposed to be the best run in the country. Former run by the incorruptible Narendra Modi and the other by the most corrupt man and family in the history of the country perhaps.


Corruption, Money Laundering and Crime in business and politics is not something new but juxtaposed with an amazing achievement does not make you feel any better only worse.

That is India in a nutshell. Make you feel happy one moment and down in the dumps the other.

Alright now on to my favorite green the humble but very tasty Swiss Chard. Available in a multitude of colors and hues it lends itself to various dishes. Swiss Chard sambhar is by far my favorite way to cook it. A stir fry with just the minimum ingredients is another tasty way to enjoy these greens. Even the kids absolutely loved it.


Swiss Chard stir fry
1. 1 bunch of Swiss Chard washed and chopped including the stems - 3 cups
2. 1/2 cup onions
3. 4 red chilies split
4. seasonings: 1/3 tsp mustard seeds, 1 tsp urad dal, a few cumin seeds and curry leaves
5. 1 tsp oil
6. salt to taste
7. 1 tbsp coconut grated

Method
1. In a pan heat oil, add the urad dal first, when it starts to brown add the mustard seeds and cumin and when the mustard seeds start to pop add the curry leaves followed by the red chilies
2. Add the onions and saute till they are slightly brown
3. Add the greens and let them cook till they are soft. Do not cover but cook in low medium heat
4. Add salt, sprinkle the coconut